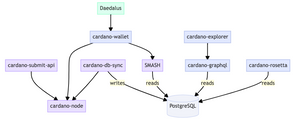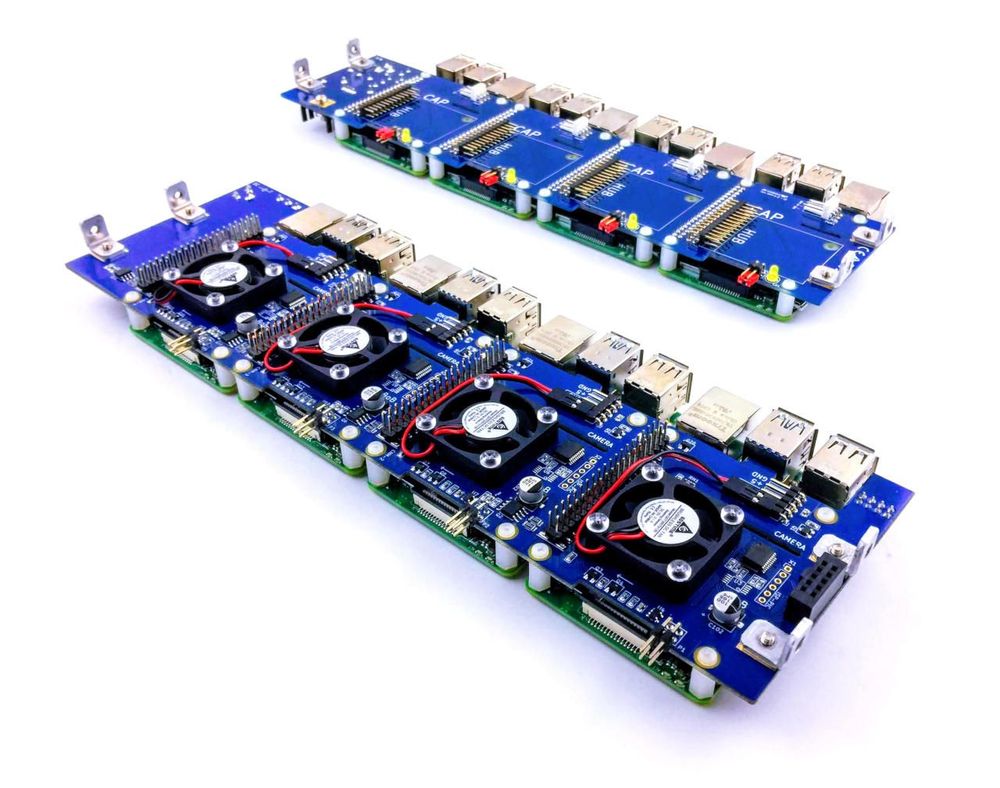
In this post, we'll configure a Raspberry Pi (RPi) 4 Model B to PXE Boot from a Synology Diskstation DS720+.
What is PXE Boot?
The Preboot eXecution Environment (PXE) specification describes a standardised client–server environment that boots a software assembly, retrieved from a network, on PXE-enabled clients. - Wikipedia
Clients require a network interface controller (NIC) and utilise DHCP and TFTP.
In data centres, PXE is the most popular choice for operating system booting, installation and deployment.
Synology NAS
The Synology Diskstation DS720+ is running DSM 7.0.1 (DSM 7.0.1-42218 Update 3).

What we need to do:
- Configure a Static IP
- Enable NFS
- Create some Shared Folders
- Edit the Shared Folders NFS permissions
- Enable TFTP
- Install and configure a DHCP Server
- Enable PXE Boot
Note: The Synology Disk Station Manager (DSM) screenshots included in this guide were produced using DSM version 7.0.1 (DSM 7.0.1-42218 Update 3).
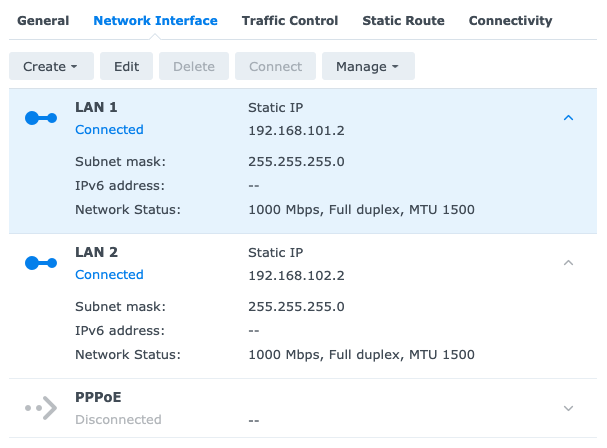
Configure a Static IP
In the DSM's Control Panel, click on Network and then select the Network Interface tab:
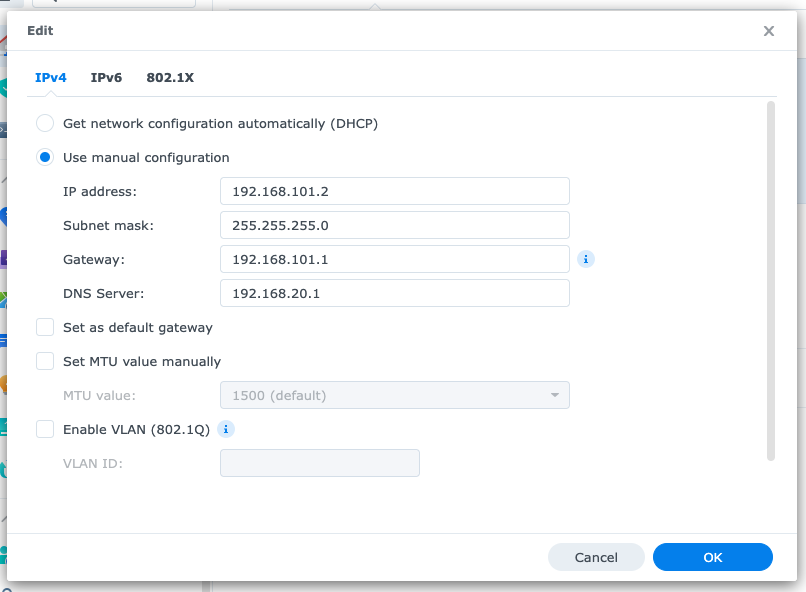
Manual configuration:
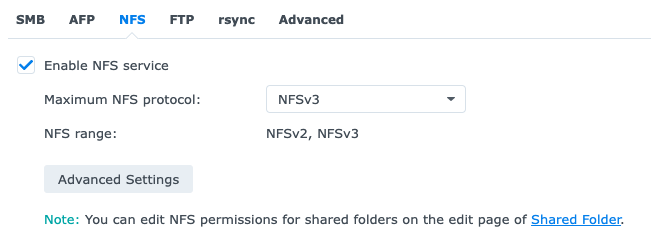
Enable NFS
In the Control Panel, click on File Services and then select the NFS tab:
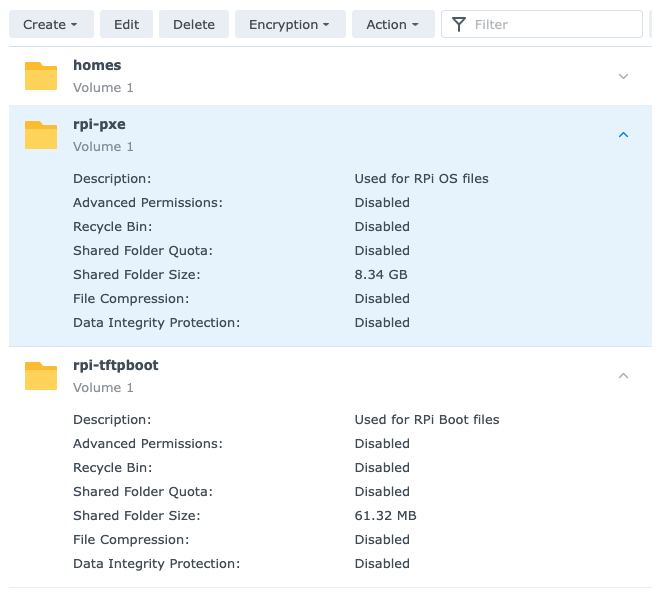
Create Shared Folders
We need to create some shared folders for the RPi's Boot and OS files:
- rpi-pxe (used for the RPi's OS files)
- rpi-tftpboot (used for the RPi's Boot files)
In the Control Panel, click on Shared Folder:
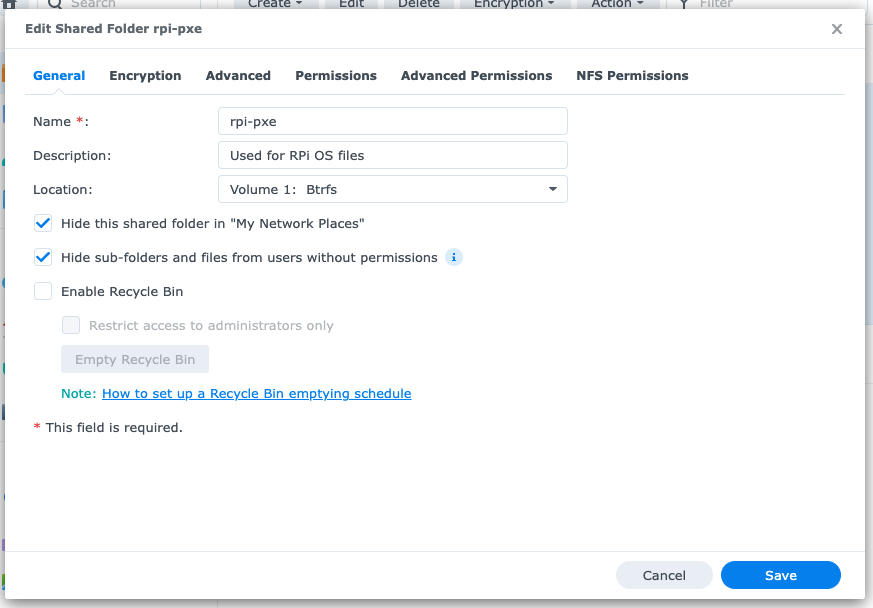
General configuration, rpi-pxe:
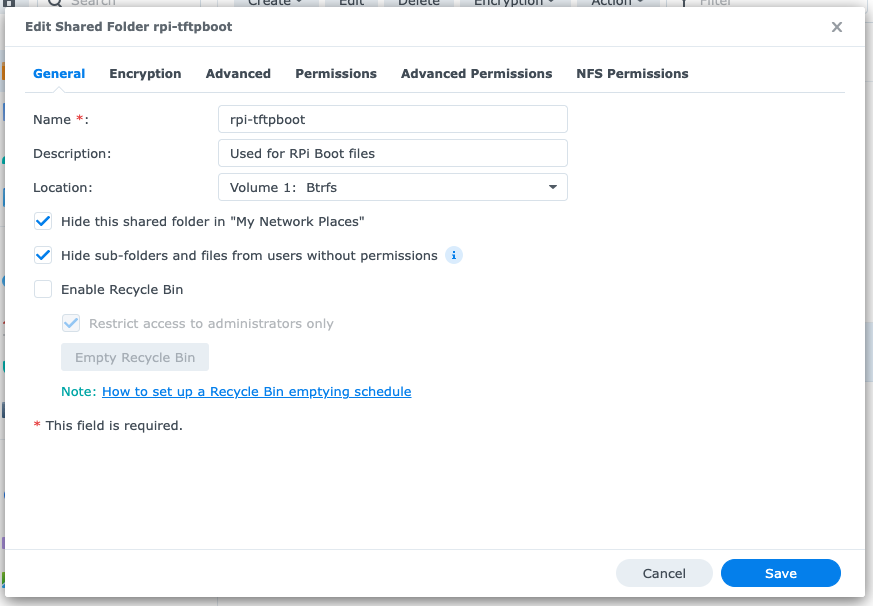
General configuration, rpi-tftpboot:
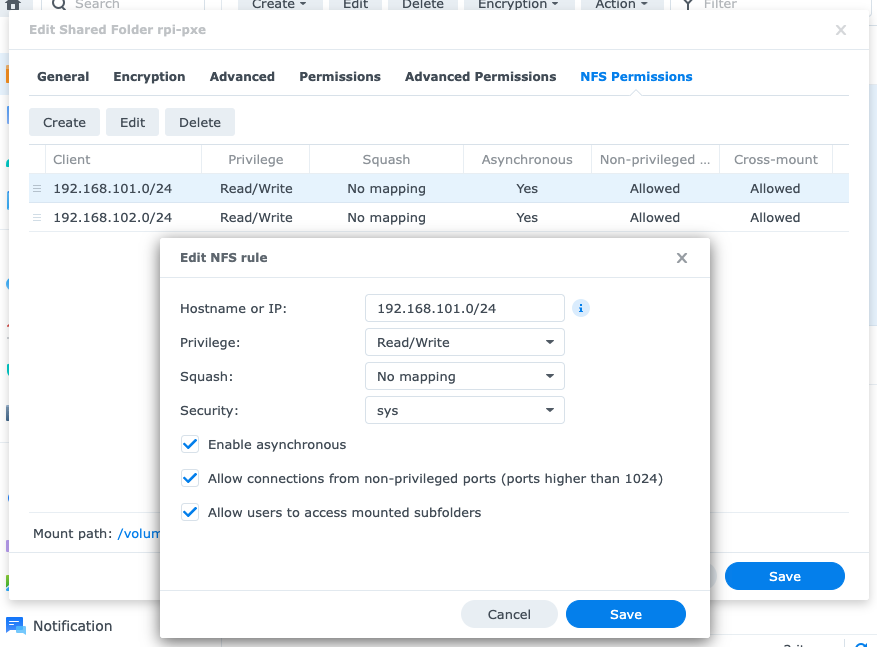
And then for each folder (rpi-pxe and rpi-tftpboot) edit the NFS permissions:
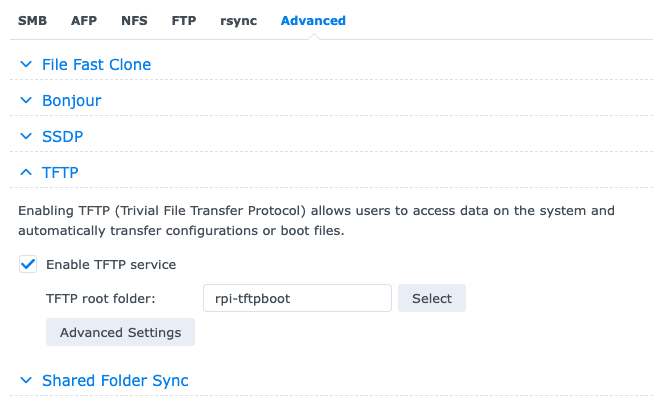
Enable TFTP
In the Control Panel, click on File Services and then select the Advanced tab:
DHCP Server
Use the DSM's Package Center to install a DHCP Server. In the DSM's Main Menu click on DHCP Server.
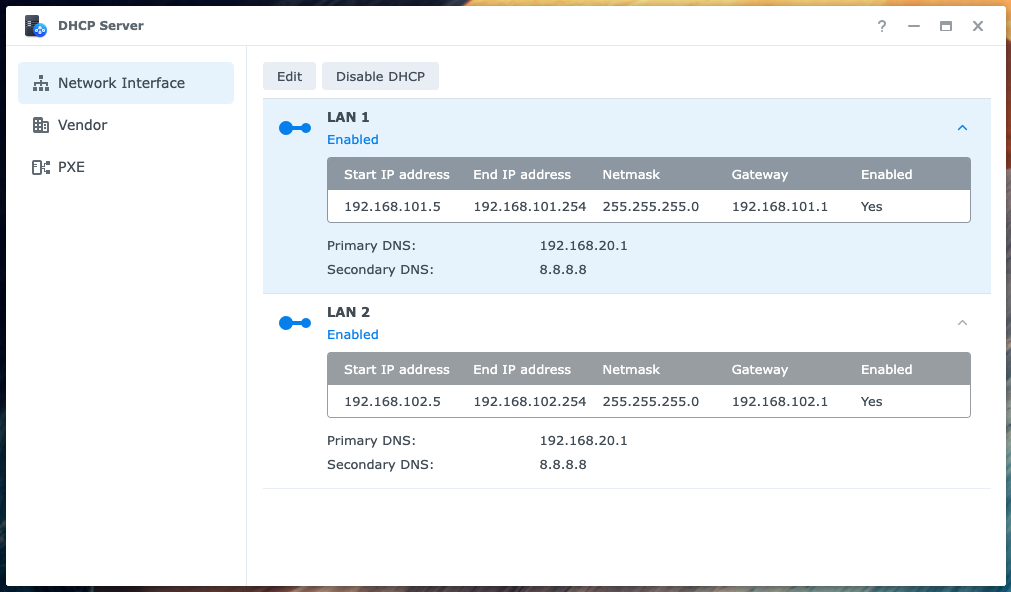
And then for each Network Interface (LAN 1 and LAN 2) enable the DHCP server:
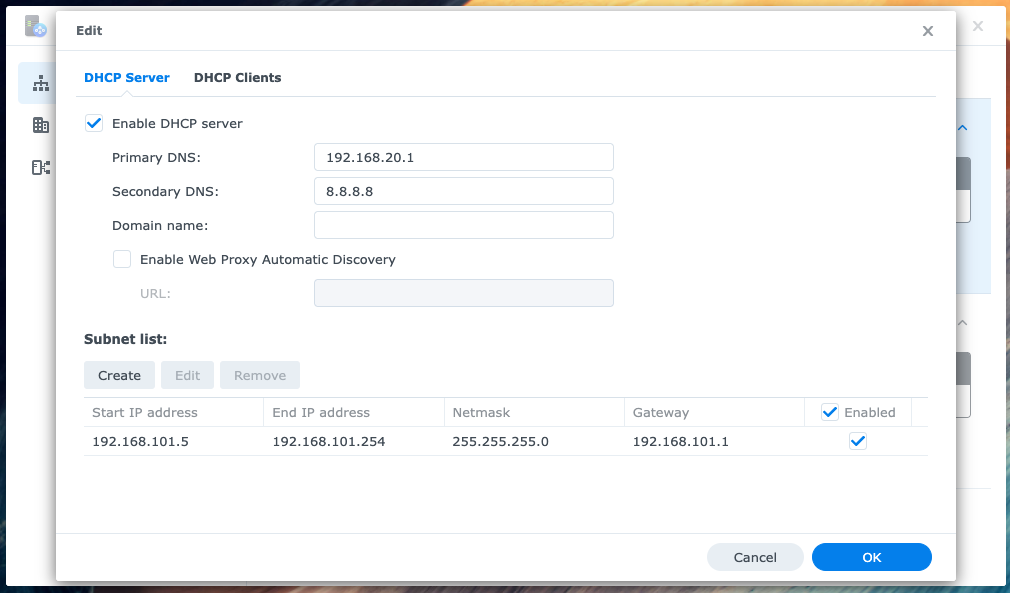
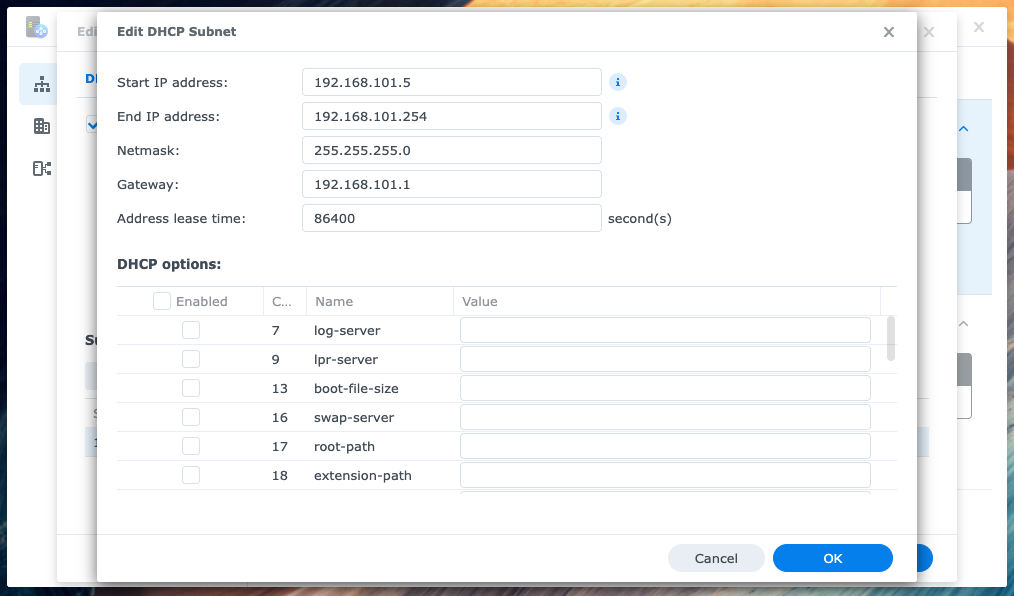
We also need to configure the Subnet list:
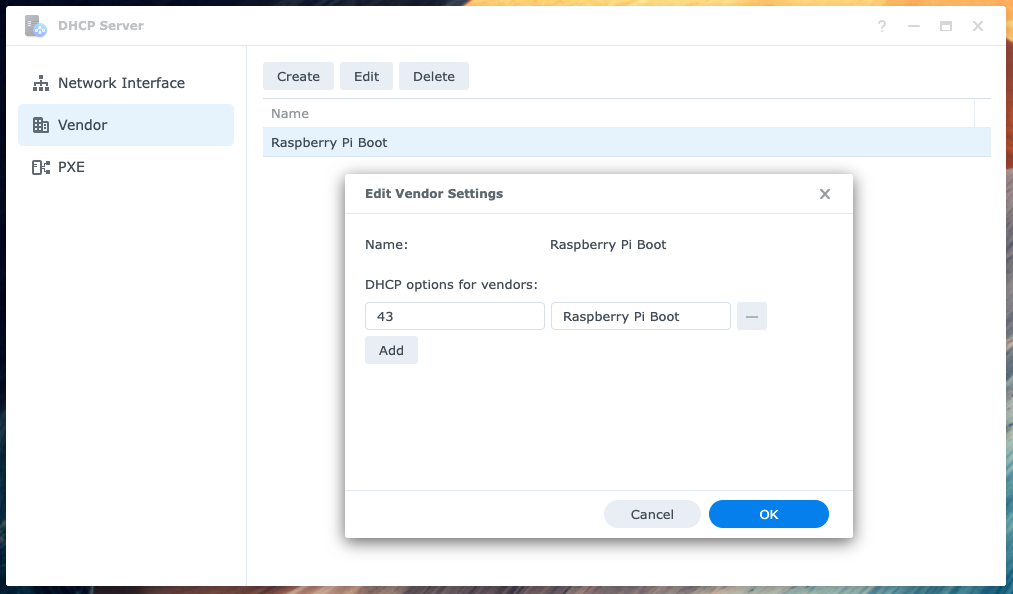
And the Vendor Settings:
There is one more configuration step we need to complete on the DHCP Server, however, we can't do that until we have setup our RPi.
Raspberry Pi
Raspberry Pi Imager
Download and launch the Raspberry Pi Imager.
Use the Imager to create a fresh install of Raspberry Pi OS Lite 64 bit (a port of Debian Bullseye with no Desktop environment). Use the Advanced options to: set a hostname (relay-node-1); enable SSH (public key only), set a username and password; set the locale settings and to skip the first-run wizard.
Note: You can use a fully qualified domain name (FQDN), for example: relay-node-1.stake-pool.orcada.io
Insert the Micro SD Card into the Raspberry Pi and power on the device. Use the DHCP Server's DCHP Clients tab to find the RPi's (dynamic) IP address.
You can also use nmap, for example:
sudo nmap -sn 192.168.101.0/24
Use SSH to connect to the device and update the operating system:
sudo apt update
sudo apt full-upgrade -y
sudo apt-get autoremove
sudo apt-get autoclean
Configure a Static IP
The Raspberry Pi OS uses dhcpcd to configure TCP/IP across all of its network interfaces. We want to assign a static IP to our RPi.
Edit the /etc/dhcpcd.conffile:
sudo nano /etc/dhcpcd.conf
And add the following lines to the bottom of the file:
...

# relay-node-1
interface eth0
static ip_address=192.168.101.3/24
static routers=192.168.101.1
static domain_name_servers=192.168.101.1
To restart dhcpcd:
sudo systemctl daemon-reload && sudo systemctl restart dhcpcd
Let's check the Domain Name System (DNS) resolver:
cat /etc/resolv.conf
You should see something like:
# Generated by resolvconf
nameserver 192.168.101.1
Configure the hostname
To configure a fully qualified domain name (FQDN) we need to edit the /etc/hostname file:
sudo nano /etc/hostname
And update it as follows:
relay-node-1.stake-pool.orcada.io
We also need to edit the /etc/hosts file:
sudo nano /etc/hosts
And update it as follows:
127.0.0.1       localhost
192.168.101.3   relay-node-1.stake-pool.orcada.io relay-node-1

# IPv6
::1             localhost ip6-localhost ip6-loopback
ff02::1         ip6-allnodes
ff02::2         ip6-allrouters
Reboot the RPi:
sudo reboot
Reconnect to the device using SSH.
Copy the OS files to the rpi-pxe Shared Folder
Create the remote mount point
Connect (SSH) to the Synology NAS, you should see something like:
admin@nas-1:~$
Create a directory in the rpi-pxe shared folder, that matches the RPi's hostname:
cd /volume1/rpi-pxe
sudo mkdir relay-node-1
And update the permissions:
sudo chmod 777 relay-node-1
Note: You can check your RPi's hostname using the following command:
hostname
Create the local mount point
Create a local mount point (directory) that matches the RPi's hostname:
sudo mkdir -p /nfs/relay-node-1
Mount the rpi-pxe shared folder (the remote mount point) with NFS:
sudo mount -t nfs -O proto=tcp,port=2049,rw,all_squash,anonuid=1001,anongid=1001 192.168.101.2:/volume1/rpi-pxe/relay-node-1 /nfs/relay-node-1 -vvv
Copy the OS files (it will take a few minutes):
sudo rsync -xa --progress --exclude /nfs / /nfs/relay-node-1/
Copy the Boot files to the rpi-tftpboot Shared Folder
Create the local mount point
Create a local mount point (directory):
sudo mkdir -p /nfs/rpi-tftpboot
Mount the rpi-tftpboot shared folder (the remote mount point) with NFS:
sudo mount -t nfs -O proto=tcp,port=2049,rw,all_squash,anonuid=1001,anongid=1001 192.168.101.2:/volume1/rpi-tftpboot /nfs/rpi-tftpboot -vvv
After mounting the rpi-tftpboot shared folder, the next step is to copy the universal RPi bootcode.bin file to the root of the rpi-tftpboot shared folder. The bootcode.bin
file is used by all RPi models and must be in the root of this shared folder for PXE Boot to succeed:
sudo cp /boot/bootcode.bin /nfs/rpi-tftpboot/
Get the RPi's serial number:
vcgencmd otp_dump | grep 28: | sed s/.*://g
You should see something like:
d7cde1e3
Create a directory for the boot files, that matches the RPi's serial number:
sudo mkdir -p /nfs/rpi-tftpboot/d7cde1e3
Copy the boot files:
sudo cp -r /boot/* /nfs/rpi-tftpboot/d7cde1e3/
Configure the Boot options
Edit /etc/fstab (the filesystem table) so that it mounts the RPi's tftpboot directory when it starts up:
sudo nano /nfs/relay-node-1/etc/fstab
Update it as follows:
proc            /proc           proc    defaults          0       0
192.168.101.2:/volume1/rpi-tftpboot/d7cde1e3 /boot nfs defaults,vers=3,proto=tcp 0 0
Edit the kernel options in cmdline.txt:
sudo nano /nfs/rpi-tftpboot/d7cde1e3/cmdline.txt
Update it as follows:
console=serial0,115200 console=tty1 root=/dev/nfs nfsroot=192.168.101.2:/volume1/rpi-pxe/relay-node-1,vers=3 rw ip=dhcp elevator=deadline rootwait
Configure the EEPROM firmware
We need to configure the RPi's eeprom firmware to include the PXE boot options.
Use the following command to identify the latest version of the firmware:
ls -al /lib/firmware/raspberrypi/bootloader/stable/
Copy the latest version of the firmware to a temporary directory in your home directory:
sudo cp /lib/firmware/raspberrypi/bootloader/stable/pieeprom-2022-03-10.bin pieeprom.bin
Create a boot configuration file:
sudo nano bootconf.txt
Update it as follows:
[all]
BOOT_UART=0
WAKE_ON_GPIO=1
POWER_OFF_ON_HALT=0
DHCP_TIMEOUT=45000
DHCP_REQ_TIMEOUT=4000
TFTP_FILE_TIMEOUT=30000
TFTP_IP=192.168.101.2
TFTP_PREFIX=0
ENABLE_SELF_UPDATE=1
DISABLE_HDMI=0
BOOT_ORDER=0x241
SD_CARD_MAX_RETRIES=3
NET_BOOT_MAX_RETRIES=5
The RPi will try to boot from a microSD card, then the network, then from any attached USB storage.
Now we can create a new EEPROM binary:
sudo rpi-eeprom-config --out pieeprom-new.bin --config bootconf.txt pieeprom.bin
And write it to the EEPROM:
sudo rpi-eeprom-update -d -f ./pieeprom-new.bin
Reboot (leave the microSD card inserted):
sudo reboot
Check the new boot configuration values using the following command:
vcgencmd bootloader_config
Synology NAS
Enable PXE Boot
There is one more configuration step we need to complete on the DHCP Server, and that is to enable PXE Boot:

Raspberry Pi
PXE Boot
Shutdown the RPi:
sudo shutdown -h now
Turn off the power, remove the microSD card, turn the power back on. The RPi should now PXE boot.
Connect (SSH) to the RPi and check the mounted filesytems:
findmnt
You should see something like:

Troubleshooting
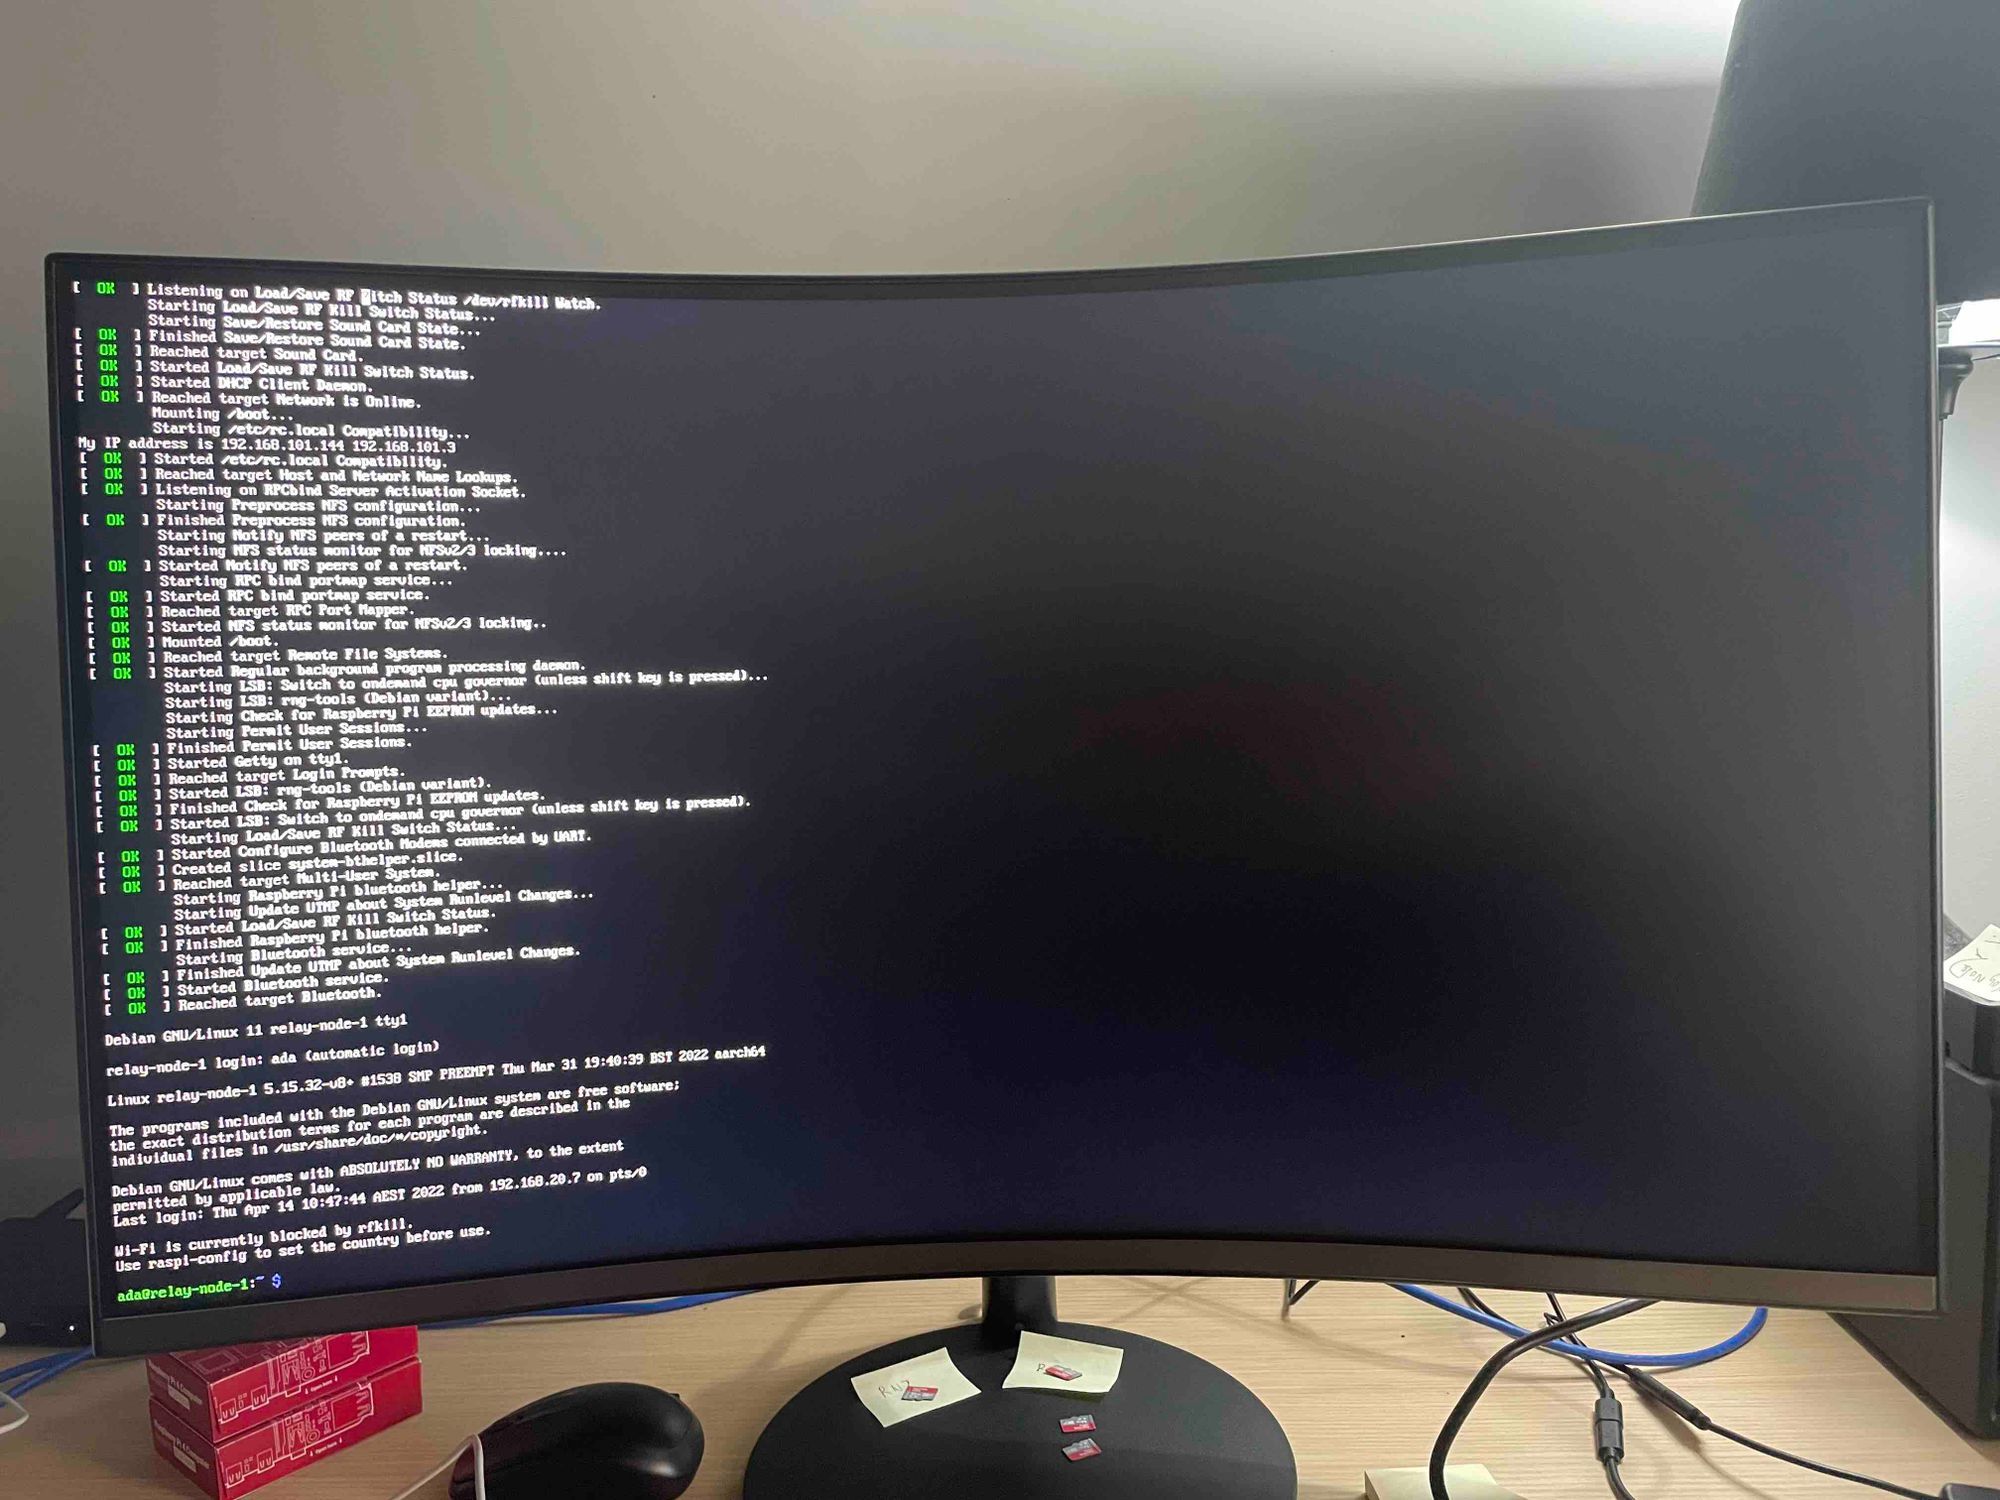
If you run into any issues try plugging in a monitor:
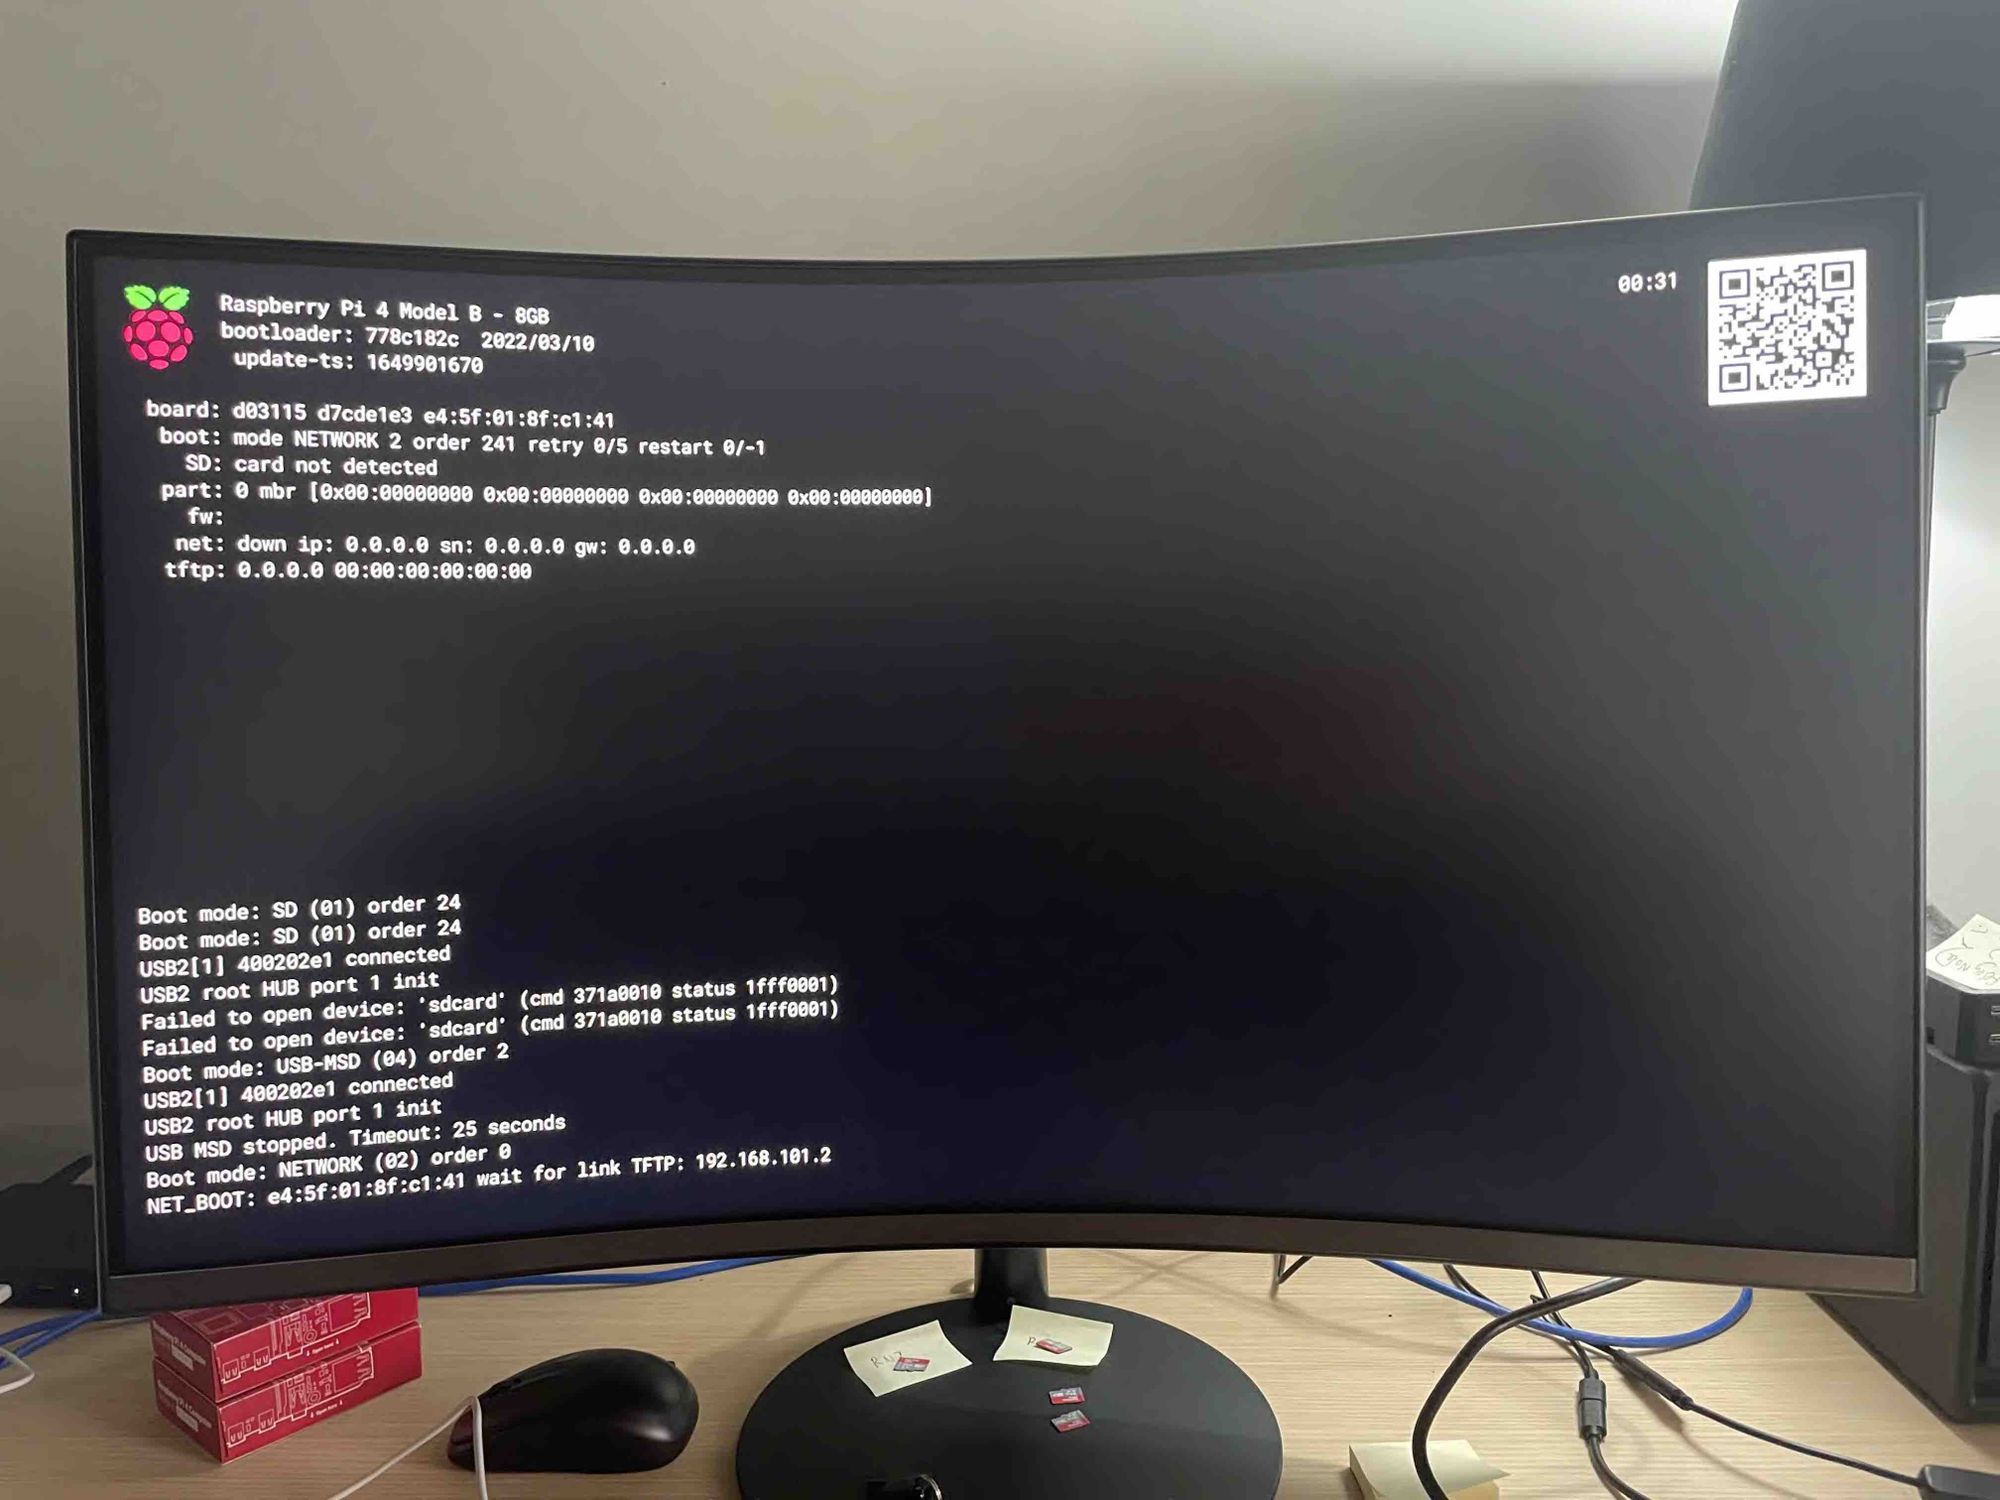
A coloured splash screen (actually it's just four pixels "blown up" by the GPU to full screen) is displayed after the GPU firmware (start.elf) is loaded:

This should be replaced by the linux console a few seconds later:
Resources:
- Raspberry Pi forum: Troubleshooting
- eLinux wiki: Troubleshooting
References:
- Mike McFarlane's blog: PXE boot a Raspberry Pi 4 from a Synology Diskstation
- John Nicpon's (Warmest Robot) blog: Raspberry Pi Network Boot Guide
- Raspberry Pi docs: Configuration properties